Showing posts with label reuse. Show all posts

Monday, October 7, 2013

My How Time Flies When You're Having Fun

Where do I begin? .....I can't believe it's been ten months since my last post!!!!  They say time flies the older you get and they weren't kidding!

Recently, my husband asked if I had given up blogging.  My answer was a firm noooooo.... I've just been a little busy this year.... but I'm almost caught up....ha ha!  I can rattle off a million reasons (excuses) but I won't bore you.  I do promise I haven't just been sitting around.  Although I haven't had time to write the blog, I have been working on projects.  Some I have "How To" photos and some I'm lucky if I remembered to take a "before" and "after" photo.  So, I've decided to share what I've been up to for the past year and you can let me know if there's anything you'd like to see step-by-step.  How's that?  I'll start with what I did in January.

PROJECT 1:  Nightstand Updates

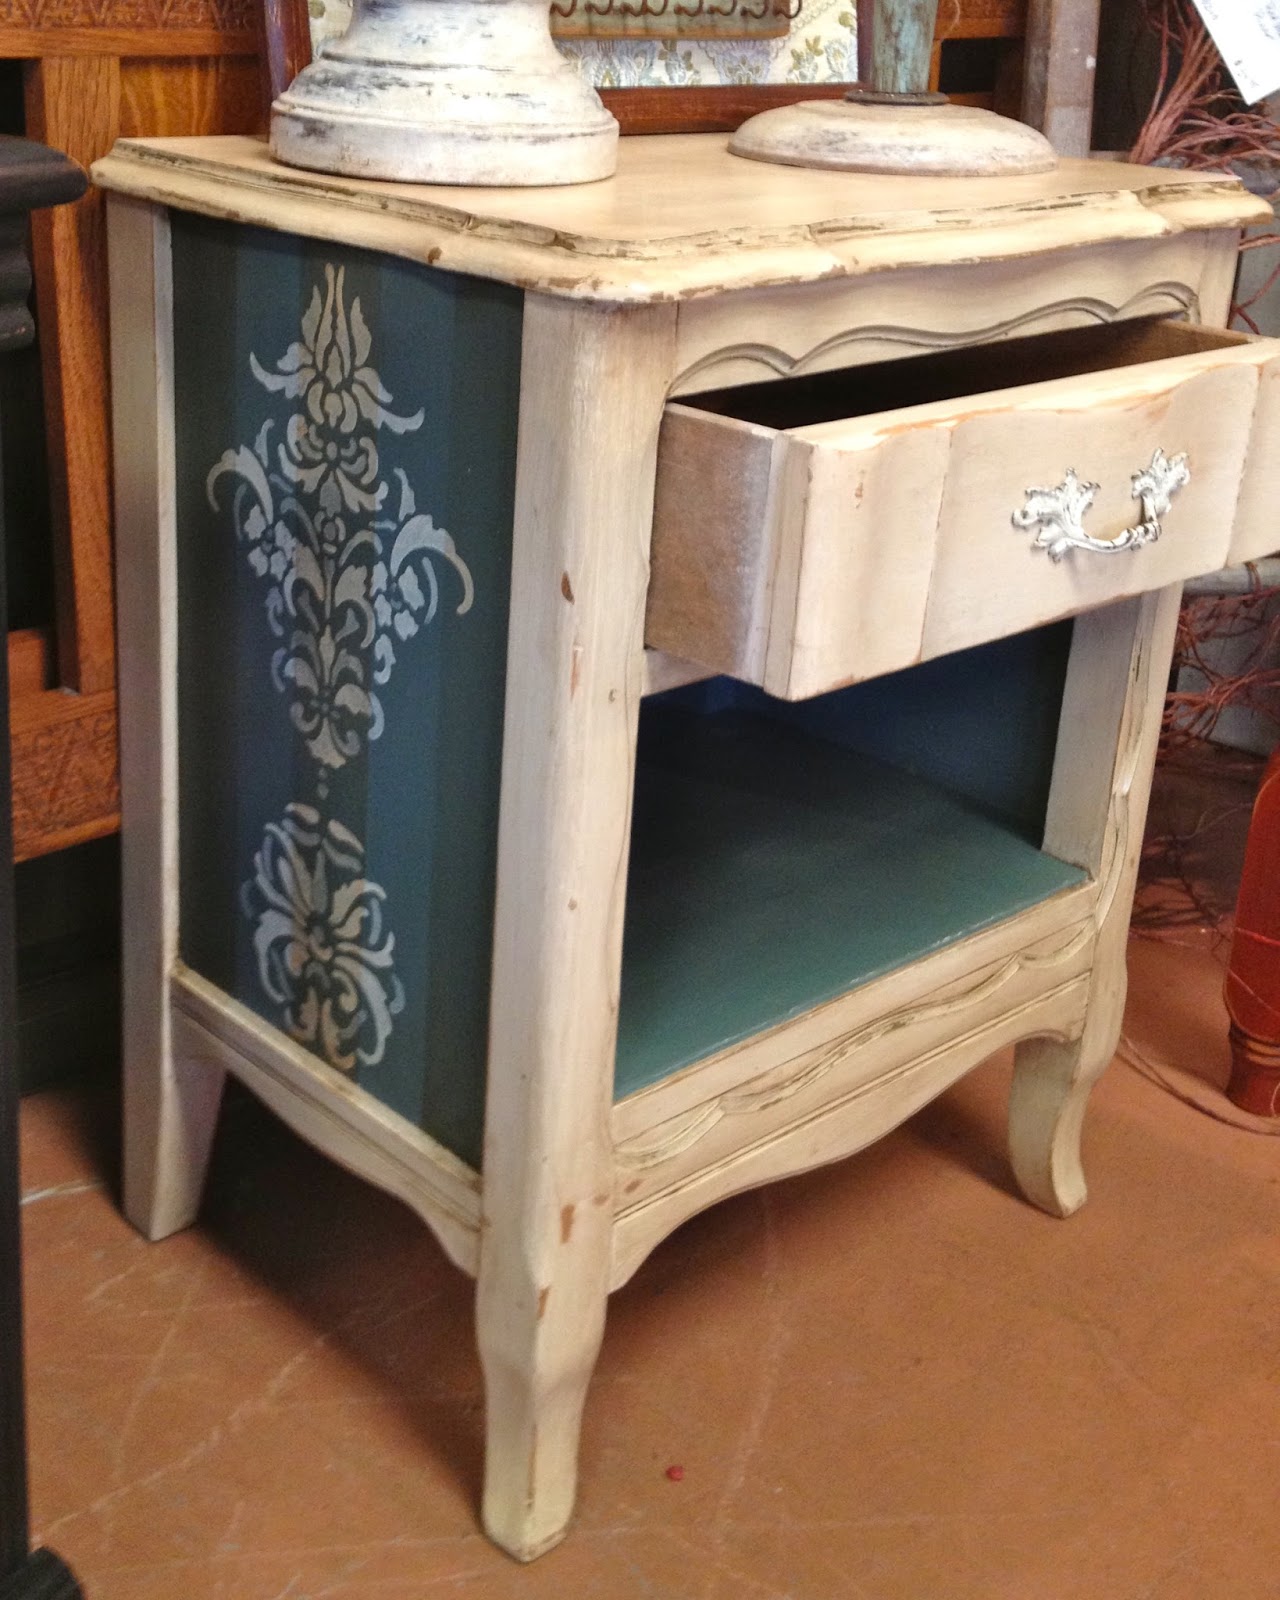
One of my goals, this year, is to empty my storage unit.  I had been collecting so many "projects" that I had to rent a storage unit.  I decided to start small and try some stenciling ideas I've had on a couple of old nightstands to give them a vintage bohemian feel.

BEFORE
AFTER

BEFORE
AFTER
I do have step-by-step photos of these two paint projects.

PROJECT 2:  Chalkboard/Bulletin Board

BEFORE
AFTER


This started out as half a swinging "saloon-style" door and ended up as a wall mount chalkboard/bulletin board. 


PROJECT 3:  Cottage Style Wall Cabinet

I don't have a "before" photo of this little wall mount cabinet.  It used to be solid black with these reproduction ceiling tin doors.  It wasn't particularly old and I wanted to give it a more "cottage" look so I painted it white, sanded it here and there and "antiqued" it with a bit of stained paste wax.

Then, I decoupaged the inside in vintage book pages and added a little blue suede bird silhouette.


PROJECT 4:  Sofa Table

I always seem to need a small sofa or entry hall size table for display....although this sold pretty quick.  The base was made with reclaimed wood and the top is a recycled cabinet door.

PROJECT 5:  Typesetter Tray Earring Holder

I saw this idea once at a craft show and thought it was a great way to turn your earring collection into wall decor.  I took one of my vintage typesetter trays and simply cleaned it up.  I wanted to keep it's vintage look so I just sprayed the whole thing with a satin sealer so that at least it looked "finished" and not grungy.  After adding flush mount hardware to the back, I added small eye screws at the top of each cubby that could hold dangly earrings.  It's a tedious project screwing all those teeny tiny eye hooks in those teeny tiny cubbies.  Pre-drilling a teeny tiny hole then using needle nose pliers to screw them in was helpful.

PROJECT 6:  Potting Bench

One of my favorite projects to make are potting benches.  Not only are they great in the garden, they make a perfect piece for summer entertaining.  I do have step-by-step instructions for this bench.  It's made from recycled picket fence sections for the base, reclaimed siding and an old enamel bowl for the top, and a vintage window attached to the back gives it the look of a buffet and a place to attach a shelf.  Painted cast iron brackets hold the window to the bench and the shelf to the window.  Vintage split legs add a decorative touch to the pickets and old glass shutter knobs are perfect for dangling garden tools.

And that's what I did in January!  Like I said, I do have step-by-step photos of the nightstand paint finishes and the potting bench if anyone's interested.

Happy Junkin'....until next time!

Friday, August 17, 2012

A Day In The Life Of A Junker...with bonus track...How To Make a Jewelry Tree


.....I had a hard time sleeping last night...feeling a little anxious about all the projects I'm in the middle of...sound familiar?  Well, this is serious...the guys are almost finished installing a new buried propane tank...which means my workshop upgrade can happen soon....
BUT I'M NOT READY!!!!  I'm in the middle of projects!  So, what's a junker to do?

Start by spending the morning cleaning out my storage unit.  I'll get rid of a few things, and make room to store some of the junk in my workshop.  This could be a post all it's own....

Lunch break...

Next, the biggest project going on in my workshop is a gear desk I'm building for my son.  After a couple hours, I have the bridge section done!  Yeah!!!!  This is definitely a future post.  It's my first attempt at building fine furniture from 4x8 sheets of wood.  Scary :)  But, so far so good; knock on wood!


Enough of that...now it's time to play!    

I promised to make some jewelry trees and organizers to put in my new Etsy Shop so here's one with a "How To".


First step,  find a lampshade to deconstruct.  I found this one at a thrift store for $1.  SCORE!

Next, remove the shade material.  I'm saving mine...big surprise, because it's mylar covered in a natural fiber paper...I have an idea...(is there a light bulb I can put here instead of a smilie face?  I'm new to this...)  Here's where I encourage you to send me a comment....really, there's gotta be a lightbulb icon I can put here...


For this project, we are only using the top part of the shade frame.  I have a very large collection of the bottom ring of this type of shade in a variety of sizes...I'm going to have to come up with something good for those....

There's usually a bit of glue and paper stuck to the metal ring.  Using a utility knife, scrape all the unwanted bits away.  SAFETY TIP:  Always cut away from your body.


When I'm repurposing materials for a project, I'm in the mindset that they are old and dingy and that's why I'm repurposing them.  Truth is, sometimes things are tossed out because they're shiny, possibly tacky, were just cheap to begin with and, plain and simple, no one wanted them anymore.  I'm finding that all the shabby, rusty stuff is currently "cool" and I have sort of a soft spot for all the stuff that even a junk connoisseur might overlook. 


Well, just like you can paint anything that's properly prepped, you can age even the shiniest, tackiest cheap-looking metal!  After you've done this for awhile, you'll develop an eye for what metal will age easily and what you need to prep.  In my experience, any metal that has a coating over it needs to be prepped so if it's shiny, it's probably coated.  Just rough it up with a little sandpaper, any grade will do, and cross your fingers.

 The secret ingredient....drumroll, please....Modern Master's Rust Activator.  I've heard of things like using toilet bowl cleaner to age galvanized metal.....so one of these days, I'm going to do a documented science experiment on everyday products we can use to age different metals....just waiting for the propane tank to be moved...a little to close to my workshop for my comfort and my nickname is "Grace" for a reason...

Because this is a "rust activator" you need to use a plastic vessel.  I'm using the plastic tray from a birdcage that I purchased at a garage sale...I used the birdcage for a chandelier or something...but this large shallow tray is perfect for rusting larger items.  As you can see in the photo, some metals age instantly while others can take awhile so just be patient.  I've learned that letting them rest in the shade is better.  If you're anxious and put them in the sun to dry faster, they actually have less time to age...hey, sort of like people (I need another lightbulb here!)  Just remember, shade ages better than sun.

Once you've aged both sides, let it rest and dry.  Here's another SAFETY TIP:  Don't touch the chemical.  Wear gloves or use tongs.  I've never had anything bad happen, but you never know.  It's a chemical.   After the metal has rusted to your desired specification, go over it with a little 0000 steel wool to remove extra bits and give the whole piece a good coat or two of sealer....remember you will be hanging earrings on this and then putting them in your ears...you want to keep things hygienic.

Next step is to find the perfect turned leg or spindle for your jewelry tree.  This is the fun part, I keep my parts sorted in 5 gallon buckets.  They're easier to move around when I want to sweep or rearrange the shop.  (I know what you're thinking; this photo and paragraph should be totally edited...but it's for the person who has said they would like to spend a day in my shop or just drop in...it's a glimpse behind the scenes.)  Glamorous, isn't it!
....I see the perfect leg back there hiding...So, I've got my leg, my new "aged" lampshade part and a couple of other lampshade parts I've previously aged.  Notice how the center hole is larger on those parts?  I don't have a photo because these have been around awhile but you know the shades that go on before the light bulb...I've taken that part apart and stuck the opposite end in the metal ring...I know, that's another post. 


I'm going to use the top end of the leg as the base for my tree.   I use my compound miter saw to make the cut but it's difficult to trim a straight cut on a turned leg.  I usually shim the leg to where I need it with a scrap of wood before making the cut to as even as I can eyeball it.  Then, I just put some sticky back sandpaper on a block of scrap wood to get the base flat and level.  I know this sounds redundant if you've read my previous posts, but my standard m.o. is to sand and wax an aged leg to further enhance it's natural patina.


Next, I need a base proportioned to the height I've chosen for my post.  I like this round metal black base from a deconstructed lamp.  It's lightweight, but large enough around to balance the height of the  leg.  I like the black but want it to blend with my other materials so I rough it up a bit and give it a coat of rust activator.  I took this photo to illustrate a specific TIP:  the rust activator is the liquid you see.  Therefore, if you see brush strokes, your rust pattern will also show the brush strokes.  Likewise, if you splashed the activator on with a brush your rust pattern would be droplets.  I'll save a more detailed rust lesson for a future post.

Once your base reaches the desired patina, give it a coat of spray sealer to finish it off and stop further deterioration.

Now that all the parts are prepared, it's time to assemble!  Yeah!  

I find a dowel screw appropriate for the size of my leg and drill a pilot hole in the leg the length of the wood screw end (the pointy end with the wider thread).  I like using a dowel screw because it gives a nice sturdy attachment that you can tighten as needed.   


Fast forward...it's getting late... now that the leg is attached to the base, I chose one of the large-holed lampshade parts first and just push it onto the leg as far down as it will go.  I don't use any permanent attachment here.  Then, add the top lampshade part.  I like to use a large decorative drawer pull to hold the top metal ring on.  This is where you can get creative and make it your own...pre-drill your hole gently; you want the knob to have a good fit.  If you drill too far it will be loosey-goosey.  

Sometimes I'll use two of the lower lampshade parts so you'd have six arms. In this case, since my leg was so long, I opted to add three rusted cup hooks 5" down for more necklaces or bracelets.

...and there you have it...a jewelry tree that's one of a kind.  So next time you're at a vintage sale and you see one really cool leg but don't know why you're drawn to it...now you know what to do with it.

And for those of you who thought it would be fun to follow me around for a day....

I think I'm tired, have accomplished something, and will sleep tonight...

Until next time.  :)  ....now about that lightbulb icon????? 

Wednesday, August 1, 2012

Take-A-Seat Bird Feeder

Once upon a time, someone told me they wished they could spend a day in my head.....be careful what you wish for.

This story is about a chair.  I seem to be drawn to chairs; and in the spirit of a true junker, I happily accept broken chairs.  After all the usual projects using backs, legs, and spindles, I find myself left with an abundance of seats with holes.  What to do?  This particular chair seat is flat but has a large hole at the center back.

The heavy hardwood seat with the hole gave me an idea.  It's sturdy enough to use as a base for something....but I want the base to look even heavier than it is so I give it my secret heavy metal finish.  (Okay...I promise to share the secret in a future blog).


When there's a hole, find a peg.....   Digging through my bin of legs, I find the perfect "peg".  The old table leg is round and tapered at the bottom, perfect for the hole, and flat on the top.  It's already white and I like the natural distressed look so I just sand it a bit here and there and give it a coat of clear paste wax (Fiddes Supreme in Light).

Now that I have a base and pedestal....I need to make something useful....

I have a little collection of unfinished bird houses that I purchased at an estate sale but you can find them at Michael's or JoAnn's.  I  pull out my old craft paints and set to work painting the little house.  I like things to look a little old and worn so I sand a little here and there and wax it with Fiddes Supreme Wax in Rugger Brown.

Now I have a tiny house sitting on a tall pedestal with a large heavy base....I need visual balance and more recycled parts.....an outdoor dining perch!

Awhile back I purchased a vintage brass chandelier that was missing some parts.  I take one of the arms and give it a verdigris finish using a chemical patina solution from Modern Masters and then a coat of spray sealer.

I love using lamp and chandelier parts because the threads are universal and so it's easy to find hardware.  Using a short coupling screw as a guide, I  drill the appropriate size hole into the wood leg.  When I need something to be extra strong, I'll put Jen Weld (a two-part epoxy), in the hole of the leg and then insert the screw.  That way, it's more like a welded in bolt and then you just screw on the chandelier arm.

For the birdseed dish, I use a rusted iron bobeche (at least that's what I'm calling it).  I give it a coat of spray sealer and use the shortest coupling screw I can find to attach it to the chandelier arm.  I like everything to have a finished look so I use a brass cap instead of a nut to attach the bobeche to the chandelier arm.  I also give the brass cap the patina treatment.

....as I said, I like everything to have a finished look so I need something for the little holes where the chandelier crystals used to hang.  I don't want to use crystals because that's not a re-use and it might scare the birds away which would defeat the purpose.   I make a little chalkboard that said "welcome" on one side and "come again" on the other.  I attach it with some recycled chain that received the patina finish.  I found a little bell from a garage sale purchase of a bird cage.  It's  a perfect door bell for my new bird house/feeder.


In the spirit of "nothing wasted",  I add the tiniest beginnings of a real bird nest to the inside of the house.  For those who don't know me, I live in the country and have a large collection of bird nests.  I started with one many years ago that my husband rescued out of a rolled up awning he was cleaning.  From that day on, everyone brings me the nests they find when cleaning.  We have a beam on our back patio that isn't the best place for building but there's always a bird that tries and so during the building season I can go outside almost daily and find the beginnings of a nest on the patio where it wouldn't stay put long enough to be finished.  I pick up all the sad little starts and figure someday this will be useful for something....because it's already beautiful!


Tuesday, July 31, 2012

Trunk Tray Wall Organizer Step-By-Step

Over the years, I've enjoyed projects using old trunks.  Often my project doesn't require using the tray or sometimes I find old trays without the trunk at a junk shop or yard sale.  Here I've created a pretty and practical wall organizer.

Materials:
Vintage trunk tray
Vintage trunk tray divider (from a different trunk)
Three glass knobs with short screws
Cork
Recycled picture frame moulding
Interesting recycled hardware or hinges to use for hanging
Rubber Cement
Wood glue
Finish nails

1.  The first step is to assess the condition of the old paper covering the tray.  If it's not in great shape or you just want to prolong it's life, go over the whole thing with a coat of Mod Podge.  The main tray of this project is a faded red plaid and was in pretty good shape so a simple coat over the whole thing was all it needed.  The bottom divider was a tan and blue plaid and had a few tears so I used the Mod Podge to glue down all the loose bits and then did a final coat on both sides of the divider.

2.  Next, screw the knobs onto the divider before attaching it to the main tray so that the screws can be tightened with a screwdriver (tough to do this after it's attached).

3.  Cut a piece of left over cork to fit in the top section and use rubber cement to affix the cork to the tray.  I have found rubber cement to work best for cork projects.  Simply brush a thin layer on both the cork and the material you are adhering to and let both piece set up for just a minute or so before putting them together.  Work out any bubbles and use a heavy book on top until the project is dry.

4.  To give the cork board a finished look, use quarter round moulding or cut up a recycled picture frame with mitered corners and attach with wood glue.  If the pieces are cut to a tight fit, this should be sufficient to hold the trim into the tray.

Note:  Depending on what you are using for a wall hanger, you might want to attach the hanger to the tray before installing the cork board so that you hide any screws that might otherwise be visible.

5.  Attach the lower tray divider using wood glue and small finish nails.  Pre-drilling small holes will help to keep the wood from splitting.   This will give you a sturdy pocket for mail, magazines, file folders, etc.

On a difficulty scale from 1 to 10, this project is about a 2.  It's quick and easy and every one is unique, pretty, and practical.


Monday, July 30, 2012

Don't Pass Up An Ugly Door....It's A Real Beauty


I'm often asked where I find such great doors for projects.  I'll share a little secret; they don't start out that way.

It's the ugliest door that has the most potential.  Believe it or not, they usually start out like this simple single panel door.  I prefer a door that has been painted several times over the years in different colors.  If you want a lot of character look for peeling paint.             


Start by scraping off the loose paint.  Then sand the door feathering the scraped edges to prevent further chipping.

I use Fiddes Supreme Wax (my favorite color is Rugger Brown) to finish the door giving it an antiqued look highlighting the layers of paint, accentuating any naturally occurring crackling, and warming up an otherwise less than appealing color.  If you're happy with the original color, use Fiddes Supreme Wax in Light which is actually clear.  You'll get the soft finish without changing the color.


There are many types of old paneled doors.  A four panel door like the gold one is a perfect candidate to be cut in half down the center for a corner shelf unit.  Simply refinish the old door as described above.

Before putting the two halves together, I added the shelf supports to each side of the door while I had them lying side by side so they would be in perfect alignment.  

Then, using a piece of square stock the thickness of the door, screw the two pieces together from the back.

Finally, starting from the bottom, screw the shelves to the supports.  It's a simple way to make a unique corner bookcase using a reclaimed door.