If you frequent vintage shops, you've probably seen great benches made from old beds using the headboard for the back and the footboard cut in half for the sides. Here's a "How-To" on building a bench when you only have the headboard.
Once you've found an old headboard, you'll need a few other pieces. Basically, you're going to build a box incorporating two front legs and attach it to the headboard.

I found these old bed posts in my stash. They will be perfect for legs because they have a flat surface to attach the side and front boards. Don't be put off by all the holes, that's what wood filler's for.
For the big slots, I cut some strips of wood, squirted in a little wood glue and then pounded the wood strips in with a wood mallet. Don't use a hammer or you'll ding up the wood.
Once the glue dried I just used wood filler in all the holes and let it dry. After it's sanded and painted you won't even know they were there.

I've used reclaimed wood from old window frames for my sides. Just remove all the nails and you're ready to go.
Cut and Prep:
First, you'll want to look at the headboard and your choice of front legs to help determine the actual size of your bench. I look at my front legs and determine which end will look best for the foot and where I can cut so that a flat part hits just where I need to attach my sides giving me an approximate 18" seat height. (A standard height and depth of seat is about 18".) Mine ended up to be about 19" high and 20" deep.
When using reclaimed materials, every project is unique and may change the order in which you decide to measure and cut your parts. I like to start with the "givens", like the headboard, the front legs, and the seat board(s). The headboard length will determine the length of the bench. I plan to mount the two short side boards in the middle of the flat part of the leg so I measure center to center of the headboard legs (a "given") minus the thickness of one side board to come up with the length of my front board. I cut the back board the same length as the lower board of the headboard (another "given") and will attach it to the post from the inside.
I've decided to use some left over tongue and groove siding for the seat. To determine the seat depth, I put several board together locking the tongue and groove together to get close to the standard seat depth. I find that four boards gets me to about 20" deep.
Realizing that the front board is going to mount to the center of the flat part of your front leg, cut the side pieces to a length that will allow the seat boards to either be flush, or just overhang the front board. It's best to allow a little overhang to hide any potential imperfections.

Once all my pieces are cut, I use a
Kreg Jig to pre-drill all my joinery holes. A Kreg Jig allows you to drill pocket holes for a strong hidden joint. Click
"here" for specifics about using a
Kreg Jig.

I like to pre-drill, sand and finish all the pieces before I assemble simply because I think it's easier to work on large flat surfaces. Besides, it's such a reward when you get to the assembly step; it's like instant gratification.
Barn Red Finish:
I've decided to finish this bench in a seven step barn red finish using
Old Fashioned Milk Paint and
Fiddes Supreme Wax. My goal is to have a rustic finish with a little crackle, and exposed layers of paint and wood. I want this bench to have a lot of depth and interest and look like it's been around awhile.
Milk paint actually comes in a color called "Barn Red" which is a very deep dark red with a lot of brown in it. This would be the shortcut if you don't want to tackle seven steps but I find it very one dimensional. Depending on your decor and the look you are trying to achieve, this may be perfect for your project.
 Step 1:
 I want to have a little crackling in my finish so I use Antique Crackle from
Old Fashioned Milk Paint.

I don't want to cover the whole thing in crackle because I don't think that looks as authentic; I want my aging to be subtle...like in real life:) Just brush a little on here and there and let it dry.
 Step 2:
 If you're not familiar with milk paint, it comes in powder form in a sealed foil pouch inside a brown paper bag with instructions. This pouch will yield one quart of paint. I like working with milk paint for several reasons: when I want an old finish it's perfect because it's old-fashioned paint, you mix only what you need so there's no waste, it's environmentally friendly, it cleans up with water, it dries fast, and it's texture makes it easy to wax right away as opposed to latex paint.

The first color I'm using is Driftwood. It's the color of aged wood. Mix equal parts powder and water. I use a plastic bowl, an old set of measuring spoons and a little measuring glass. It's perfect because it has markings for tablespoons on it. That way I can use the spoon for the powder and the glass for water getting an exact measurement. Then, it's like mixing cake batter. I find it easier if you use warm water because it helps the powder dissolve. I use a wire whisk and just keep mixing until the powder is completely dissolved and the paint gets silky. It starts out pretty grainy, just keep mixing. You'll probably need to stir it occasionally while you're painting. I find it easier to just mix a little at a time and make more as you need it.

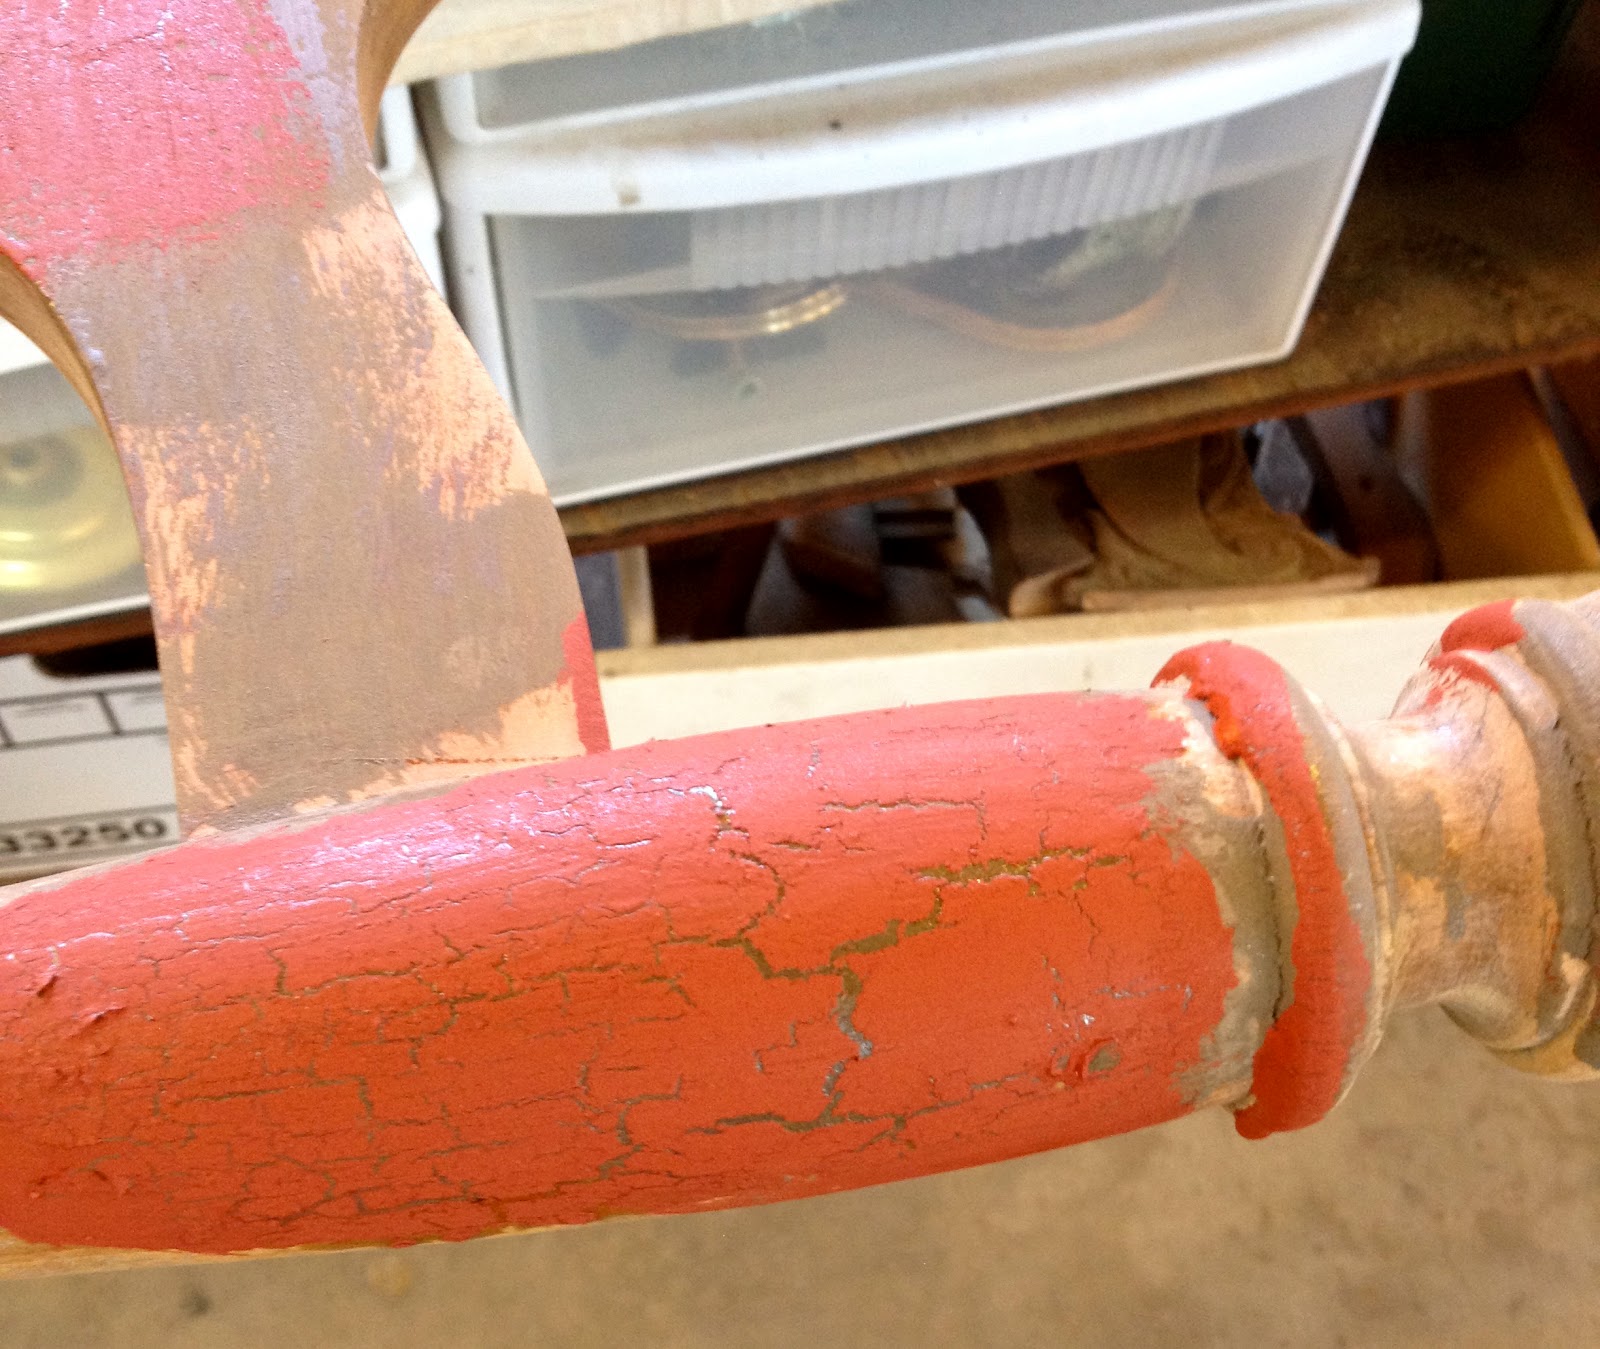
Since these first few steps will be my exposed under-layers, I don't need to cover everything. Once the crackle dries, you'll be able to see where it is. It will be a little darker and shinier than the unfinished wood. I'm just going to hit those spots with the Driftwood paint so that I will have crackling in those areas.

Tip: If you've never worked with crackle medium before, here's a tip. The most important thing is to have enough paint on your brush to cover the whole spot in one stroke. You cannot go back over that area a second time before the paint dries or you will remove the crackle.
The nice thing about working with milk paint is it dries so fast you can see the crackling immediately.
I set my boards on a table in the sun to dry and by the time I finished everything, they were dry and ready for the next step.
Step 3: More crackle. Steps 1 & 2 give me areas of driftwood paint with natural wood crackles. My final color is going to be Salem Red and I want some more crackling with Driftwood and natural wood crackles through the red paint so I add some more crackling medium here and there some over the driftwood and some over the natural wood.

One of the nice things about crackle after it's dried is that you can paint over it with another color and it will still crackle through.
Step 4: I'm using Salem Red Milk Paint instead of Barn Red. It's a brighter red and my final waxing step will darken it up and add in the brown.
I'm going to be painting everything red but want to make sure and get all the crackle parts first. This way, they can be working their magic and I won't accidentally go over them more than once.
I can see the dried crackle medium on the Driftwood paint. I have to hit this spot in one stroke.
The crackling happens pretty quick so I just need to fill in the rest with red.

You can see that by the time I finish my last board everything else is dry and ready for the next step.
 Step 5:
 One of my favorite steps is sanding off after paint. It's when all the character of the piece starts to come forward. I sand all the edges and details to highlight them. Then, I sand a little here and there on the flat parts where I want to expose the under colors and natural wood being careful not to sand off the crackle.

You can see it doesn't take much. This step is really pretty quick. You can do this by hand or with a sander. Just keep in mind that the wax will highlight every imperfection so if your sander is skipping or making obvious sanding marks because you're using too coarse a grit, that will show up in the waxing.
 Step 6:
 Using
Fiddes Supreme Wax in Rugger Brown, I wax all the parts. Be sure to wear gloves and work in a well ventilated area on a protected surface.
Using a chip brush apply a small amount of wax and immediately wipe off the excess with a rag.
I work in very small sections so that I can remove the excess wax before it starts to dry. Once it starts to dry it's much harder to wipe and you really have to get it all off or it will be tacky when you try to buff it.
Here you can see the difference between the waxed and unwaxed leg.
Step 7: Now you just have to buff all the pieces to your desired sheen. I use a pine brush attached to my drill. (I don't have a photo here but you can see this in a previous post by clicking
"here" and going to Step 8 in that post).
The leg on the left has been buffed and then wiped with a clean cloth. The one on the right doesn't shine and would feel a little tacky to the touch.
Once everything is buffed and wiped we're ready to assemble.
You can see all the gorgeous detail and crackle, a little driftwood showing through as well as the natural wood. Perfect!
Assembly:
I'm going to start assembly by attaching the front board to the two front legs. I want the board positioned in the middle of the flat part of the leg, so I like to use another piece of wood set under the piece I'm attaching to give myself a nice firm base. I use this trick so that my positioning is consistent on both sides. I do have to measure from the top edge of the board to the foot so that I get my height right on both sides for a level bench. Then, just screw into the leg through the pocket holes.
Next, I'm going to attach the shorter side boards to the back of the front legs.
Trick: Here's a little trick I like to use to get my positioning consistent on both sides. First, I clamp a piece of wood to the leg on the outside.

This will give me a firm base to butt a second piece of wood against on top of my leg.
Here, you can see a little better how those two boards help me line up the side piece. It makes it much easier for me to get the correct positioning to attach the side board to the leg. Do this on both sides and everything should be squared up, even, and level.
Tip: Since I have three pocket holes, I screw in the center hole then double check my measurement. If anything has slipped, I can just take out that screw and reposition. Then, use one of the other holes until I get it right. At that point, I just go back and screw in the other two. With three screws in each board I have a really strong joint.

Once I have the three boards attached to the front legs, I attach the back board to the headboard making sure I have the top of the board at the same height as the other three. I decided that since my bench was so long I should beef up the seat with a couple more pieces of wood. I cut them to fit and just sand and wax them since they will be hidden under the seat.

I dry fit the seat boards before installing them because I need to notch them around the legs. Measure the size of the notch and draw it on the board. Then, using a jigsaw, cut out the notch.
This board already had a little notch in it; ignore that because it has nothing to do with this bench. I cut on the line that is drawn. I like to cut it a little inside the line and then sand it to exactly where it needs to be. This way you get a perfect fit instead of it being a little loose and the sanding cleans up the cut. I did add a little wax to the fresh cut just so I wouldn't have a "shiner".
Starting with the back board, screw it from underneath through the predrilled pocket holes. Add the next board locking in the tongue and groove and screw it down. Do this until all the boards are installed.
And there you have it; a nice sturdy bench. It could go anywhere, but since it's a headboard wouldn't it be great at the foot of a bed? Add a cushion and pillows and give it a little of your own personality.
This bench measures approximately 57 1/2" long x 22 1/2" deep x 36" high. The seat measures 56 1/4" long x 20" deep x 19" high.
This bench is for sale and can be seen in person at
Pomar Junction Vineyard & Winery. I have a small retail space at Pomar where you can purchase my handmade items seven days a week. Click on the link for directions and hours.
If you have any questions about this post, feel free to use the comments box provided or
click here to send me a message on Facebook.
I've shared this post on
The Brambleberry Cottage's Time Travel Thursday Link Party. Check it out if you'd like to see many wonderful creative ideas. Happy Fall!

 My new space had no real walls so I would need to get creative. Even when there are walls, I like to soften the corners or create a little interest on a flat wall. Folding screens are the perfect solution. They offer a pop of color, a little dimension, add height where needed, make a nice backdrop for vignettes, and when placed with the louvers up they are a great place to hang things.
 You don't have to worry about complete coverage on the first coat since there will be a couple of other treatments to follow. The goal is to have just a little mustard yellow showing through the blue and you may want to have some of the natural wood showing through as well. (Note: The color in this photo has been enhanced and because of lighting is not a true representation.)