Monday, January 21, 2013

This Junker's Struck GOLD!!!


After too many frosty days in Paso.....I know, I know, it's nothing compared to places where it snows but when it's in the 20's outside it's in the 30's in my workshop and no fun at all!  So, I decided to hightail it to the desert for some sunshine and warm weather!  I might not have a workshop there, but I can go junkin'...


I'm a walker....I'm not a big fan of exercising in a gym; but I love to walk and hike and work in the workshop for exercise.  Yesterday morning, I asked my husband if he wanted to go for a hike in The Cove with me.  I love hiking The Cove.  It's only a five minute drive from the house and there are lots of great trails.  You see, once upon a time, the Coachella Valley used to be under water...that's why they call this area The Cove.


It's such a strange and unique landscape.  I wish I would have taken more pictures!  There's this one spot with these HUGE rocks over a very large area.  To the right (outside the photo) is what looks like a ginormous empty pond and then a spot where water can be released.  My husband says they have these all over the valley to control the runoff during flash floods.  I can't imagine that since the average annual rainfall here is about an inch.  But I guess it can happen.  We do get snow on the mountains around us and I guess when it rains, these mountains are so rocky the water just runs off instead of absorbing into the ground.  I bet there are a lot of snakes and lizards living in this field of rocks!

So, for those of you who don't know my husband....he's like a curious little boy.  I just love that about him....most of the time!  For today's hike, he wanted to explore this one mountain to see if there was a path that we could climb to the top.  Once we got around the back side, there were several large dens scattered all over.

Being the cautious one, I let him go ahead and check it out...  After all, I've been to The Living Desert (a great local zoo) and I am aware that this is NOT the zoo, this is the wilderness desert, and we do have mountain lions, coyotes, and all sorts of wild animals so I'm thinking one might be sleeping in that den and decide to stay down here where it's safe and take a picture....just in case.

After walking for a half hour or so, we decide to cut over to the wash.  I like walking in the wash because it's great exercise for your legs.  It's like walking in very coarse deep sand with rocks scattered around...much harder than walking on a path.  Too bad I didn't get a picture of the wash...next time.

That's when I spotted it!

....junker's gold!

Okay, confession....this isn't exactly where I found it...but I was sooooo excited and shocked that my husband was actually willing to haul it out of here and home that I forgot to take a picture!  Seriously, you have to know my husband...he's NOT a junker and has never been excited about me bringing more junk home.  But he truly loves me and just wants to see me happy.  So...when I was sincerely excited to see this bedsprings lying there, not so much rusted as perfectly baked by the desert sun, and I blurted out that this was like gold in my industry....he said, "well if it's like gold...and we'd probably be doing a good thing hauling it out of here."  Who knows how long it had been there.  Where we found it in the wash, the wood frame was still laying charred on the ground in a rectangular shape but almost totally disintegrated.  Not a thread of fabric in sight and bits of scrub brush where the bush had just grown up through the springs.

We pulled it out of the brush and my husband decided this would be a nice little upper body workout hauling it out of here...

How lucky am I!  I know I told my husband that the bedsprings were like gold....but he's the real treasure!

....

As we were hiking back out with the bedsprings, I was blogging in my head and realized I still have to get this thing back to Paso, I'm not in my truck, and I do have other things to take back with me....where there's a will, there's a way.


To get it home, we had to fold it in half since the FJ isn't quite long enough.  Now, I'll just have to take it apart to get it back to Paso.  A pair of needle-nose pliers should be all I need and I know we have a pair in the garage.


Just look at that patina!  Not really rusty; nothing rubs off.  But perfectly baked to a rich warm bronze color.  I can't wait to get back to my workshop and see what I can create.  I'll have a six hour drive to think about it....stay tuned.


Thursday, January 3, 2013

An Update to The Post "You Get What You Pay For: Made in China...Re-Made in the USA"

So, what happened to the second little stool?  Well, I decided to try out a different finish....if you've already read this post, just jump to the end...

Who doesn't love a bargain?  We get a little excited when we shop discount stores and find what seems like a good deal; until we get it home and find out it doesn't perform under normal use.  There's a reason it was inexpensive; it was cheaply made.  Cheap, yes; a bargain, not so much.  It is true, you get what you pay for.  The good news is that we don't have to throw it out.  With the right tools and a little patience, we can re-make these items into functional pieces that we can enjoy for years to come.

A friend found this pair of little stools at a yard sale and brought them to me thinking I could do something with them.  

I don't always have a plan when I begin a project.  I usually just start dismantling and let the process evolve depending on what I uncover.  I started by removing the seats.  

I use my Craftman staple puller and a pair of needle nose pliers to remove all the staples.  I like to start with a clean slate so I always remove all the old fabric.  This way, not only do I eliminate any lingering soil and/or odor associated with the old fabric, I can check the condition of the foam and replace it with new foam and/or add Dacron.  In this case, the stools weren't old so the foam was in perfect condition.


These stools were a little rickety so if they were to remain stools, I needed to find out how they were made and see why they weren't sturdy so I could fix them.

The tag on the bottom of the seat said Made in China.  This was my first clue that they were probably slapped together as cheaply as possible.  What I found was that they were assembled with finish nails and there was not a screw in sight. If you've followed my blog at all, you know how I feel about using finish nails for structural purposes.  If you need something to be sturdy and last, glue and screws are the way to go.  

Unfortunately, the only way to really get this stool sturdied up is to take it apart and remove all the nails so I can drill holes, glue, and screw.  The good news is that it makes the project much easier to sand.  Once all the parts are sanded, it's time to pre-drill all the holes.

Using a special drill bit, I've drilled counter-sunk holes so that my screws will be flush for a cleaner looking project.

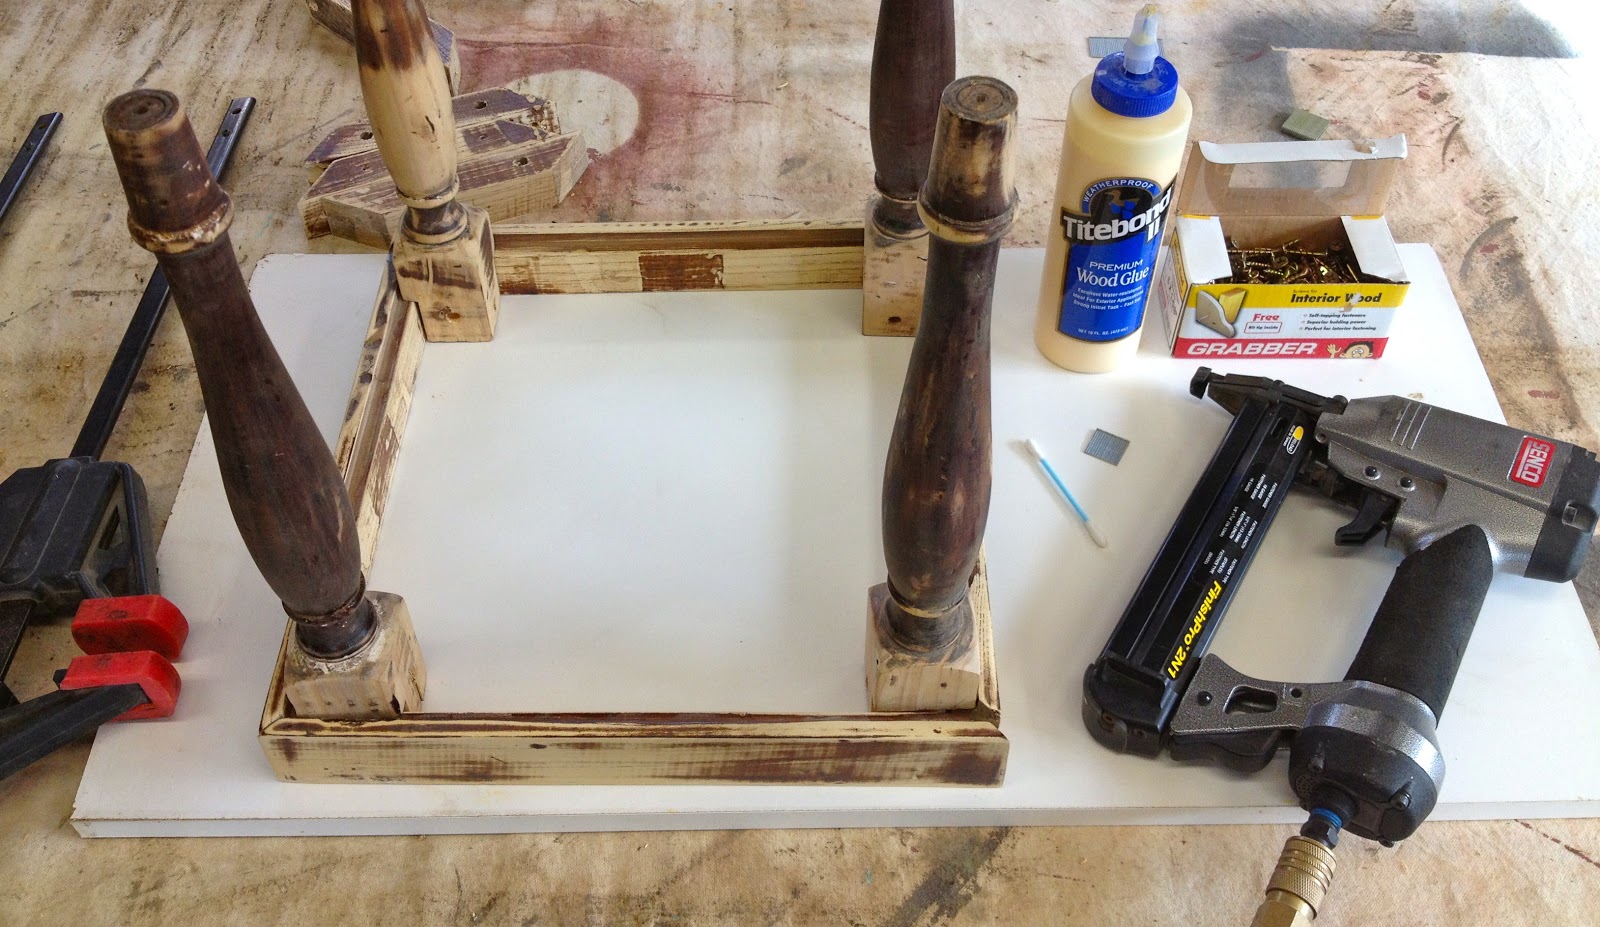
Once all the holes are drilled, I put together all the tools and fasteners I will need to re-assemble the stool.  My worktable is an old redwood table and it's important to have a nice flat surface so I use a nice large recycled piece from a melamine cabinet.  I also need a good wood glue, screws, clamps, and a finish nail gun that I will use to assemble the corners of the frame.  The nails will hold everything together while I screw the legs to the frame and corner supports.

I love buying new tools....and I finally get to use this corner clamp which will give me  perfectly square corners.  Once the two pieces are glued and clamped into place, I add a couple of finish nails and continue with all four corners until I have my stool frame.

I've glued and screwed the legs to the frame, then glued and screwed the corner brace to the frame.  I also added a screw to the center of the brace that goes into the leg.  This will add additional strength.  

Once you've put the leg on one corner, the drill won't fit to screw the legs into the other corners.  Fortunately, I had this ratcheting wrench fitted with a phillips bit to attach the remaining three legs.

After the stool was reassembled, I chose to paint the base with Old Fashioned Milk Paint.  I decided on this really pretty blue green called Sea Green.  I added their product, called Extra Bond, to the paint which basically turns the paint into a paint and primer.  
I wanted to add a second coat to a few thin spots so I pulled out my hair dryer to speed up the process.

Happy Accident!.....As the paint was drying, I noticed some natural crackling and spots where the paint was already peeling...possibly where the sanding wasn't down to the bare wood.  


I love, love, love how this looks so natural!  I know I need to finish it but I don't want to mess up this look.


Milk paint is inherently chalky and has bit of a rough gritty finish.  I decided to use a very fine sanding sponge over the whole thing to smooth out the finish.

The result was a nice smooth finish with even a little sheen here and there.  

Although I love the color, I am torn between using a clear sealer, clear paste wax, or my Rugger Brown paste wax which will change the color a bit but enhance the character.

I decided to do a test patch on the underside of the stool using the Rugger Brown.  After brushing on a bit of wax...

...I wiped it off immediately and decided it was subtle enough and only improved the finish.  Yeah!

Once, I had waxed and wiped the entire stool, I did a quick buff with a pine buffing brush and....

...Tah Dah!!!!   Gorgeous!!!!

After recovering the seat in burlap, this little stool was ready for display in the shop.  

It won't last long....in the shop that is....

I don't know what it was sold for the first time, but now it is definitely worth the $39.95 price tag I have on it!


After taking the second stool apart, sanding, and rebuilding just like I did with the first one, I decided to do a quick finish using red spray paint.  This works great when you want a REALLY distressed look with just a hint of paint.

Sand the pieces leaving some of the stain so that there is a nice balance of light and dark.  Then, just spray paint the whole thing in whatever color you like.  For this project, I used a fire engine red.

Next, I went over the whole thing with my favorite Rugger Brown Fiddes Supreme Wax.  Because this wax has a solvent in it, it actually removes most of the spray paint leaving me with a mostly waxed piece with just a hint of color.

As you can see in the closeup, the spray paint gets very smeary and a bit sticky.  I would suggest wiping off what you want and then let the wax dry.  Even though it is sticky and slippery at this point, once it's dry, you can buff it as usual.

After the piece was finished, I simply recovered the top in burlap and took it down to the store....

Well, wouldn't you know...I forgot to take an "after" picture and it sold right away.  Guess it was a hit and I'll have to try it again!


Sunday, December 30, 2012

Never Underestimate Your Painting Abilities: A Fix-It Lesson

A nice gentleman left a gift for me in my new space at Consignage Home & Garden.  He makes these nice pedestals but said he didn't think he had a knack for painting them and wondered what I would come up with.


I decided rather than starting over, this pedestal was the perfect painting lesson.

The secret to aged, distressed finishes are multiple layers of paint, sanding, and then enhancing character with antiquing which can be achieved with a variety of products.

My new friend had applied three different colors of paint which was fine for the first step.  It looks to me like he painted the most neutral color first, the gray driftwood color.  Next, he added the second most neutral color, the yellow; and last, the boldest color, the blue.  In theory, I understand why he did it this way.  I also like to use those proportions; mostly neutral, less medium color and the least amount of the boldest color.  However, I usually approach them as if they had been painted over time applying the boldest color first, and so on, ending in the most neutral color.  That way, when you sand back, you reveal the colors the more you sand with the boldest color showing up last in the smallest amount.  It's more work but gives you a more authentic look if that's what you're after.


Using a fine sandpaper, I simply sanded the entire pedestal which blended and blurred the different colors into each other and exposed some of the natural wood.


My favorite method for antiquing is to use a stained paste wax.  I prefer Fiddes Supreme Wax in Rugger Brown.


Wearing rubber gloves and working in small sections, apply the wax with a chip brush or piece of an old t-shirt and wipe off immediately with a clean cloth.


Once the entire piece is waxed, you can buff it to the desired sheen using a pine brush on a power drill or a clean cloth.

So, next time you are struggling with your painting skills, just tell yourself it's step one and keep adding layers until you achieve the desired finish.

Check out the "Finishes" button at the top of the blog for links to specific posts on various finishes I have tried.


Thursday, December 27, 2012

Time To Try Something New: Paint & Crackle Color Experiment


While I haven't posted in quite awhile, I can assure you I've been hard at work.  Shortly after my last post, I was offered a space at Consignage Home & Garden starting December 1.  The call came on my way out of town for week and I wouldn't be arriving back home until just before Thanksgiving....no pressure there.  Of course, I said yes and my wheels started turning.  With my workshop now workable I decided to hit the ground running.

My new space had no real walls so I would need to get creative.  Even when there are walls, I like to soften the corners or create a little interest on a flat wall.  Folding screens are the perfect solution.  They offer a pop of color, a little dimension, add height where needed, make a nice backdrop for vignettes, and when placed with the louvers up they are a great place to hang things.

I had two pair of unfinished closet doors found at Habitat For Humanity but you can also recycle old painted doors; just sand a little and clean them up for the first coat of paint.   Since I've been going through a neutral finish phase on my refinishing projects, I decided to do something a little more bold on the doors to give me a darker backdrop to the lighter furniture.  I didn't really have a color in mind when I started, but thought it was time to change it up and do something different than I've ever done before.  Inspired by a French tablecloth, I decided on a mustard yellow under coat with a rich blue on top.

I usually use Antique Crackle from The Old Fashioned Milk Paint Company, but have heard that white glue works too.  I decided this would be the perfect project to do a comparison of the two.


I started with a first coat of Mustard Yellow from The Old Fashioned Milk Paint Company.  I use an old plastic bowl and wire whisk to mix the powdered paint and add Milk Paint Extra Bond.

You don't have to worry about complete coverage on the first coat since there will be a couple of other treatments to follow.  The goal is to have just a little mustard yellow showing through the blue and you may want to have some of the natural wood showing through as well. (Note:  The color in this photo has been enhanced and because of lighting is not a true representation.)


Once all four panels were painted, I applied white glue to one side of the doors in spots where I would want a little crackling.   Although the glue goes on white, it dries clear and made it pretty hard to see where the glue was when I went to paint the second color.  It's also thinner than the Antique Crackle and wanted to slip and drip while it was drying.  It would have been better to let it dry on a horizontal surface.

On the reverse side of the doors, I used my usual Antique Crackle from The Old Fashioned Milk Paint Company.  I still prefer this product by far.  It is thicker than the white glue and even though it is clear, it dries with a shine that makes it really easy to see when adding the second coat of paint.


The second coat of paint is also from The Old Fashioned Milk Paint Company and is called Soldier Blue.  Again, I didn't worry about complete coverage because I plan to sand the whole thing again anyway.  I'll admit I got a little too messy applying the second coat of paint but this was an opportunity to show how you can't really mess up when creating distressed finishes.

When applying paint over crackle medium, the key is to brush the paint on in one stroke.  If you go back over the crackle a second time you will actually smear and remove the crackle effect.  What happens then is that in trying to get enough paint on your brush to get coverage in one stroke there are heavy paint areas and light paint areas.  Also, because the crackle medium is shiny, the paint over the crackle has a different sheen than the paint over paint.  In the end, I didn't see much crackling at all on the side with the white glue.  The crackle was much better with the Antique Crackle medium.

The final sanding will even all that out.  Just sand to blend the two finishes into each other and sand off any globs and drips.  Sanding will also give the project a more "distressed" look than just a messy paint job.

Now, you can choose to seal the project in a couple of different ways.  A clear sealer of any type will keep the color as you see it.  I wanted to tone down the brightness and give the project even more depth so I chose to use Fiddes Supreme Wax in Rugger Brown.  I've detailed this process in the post How To Build A Bed From A Bench With A Barn Red Finish.  


The last step was to age the hinges.  I didn't want shiny new hinges on my distressed "aged" screen so while I was busy painting, the hinges and screws were soaking in a rust activator.  After rusting things, I always use a clear spray sealer to give them a finished look.  A satin sealer will give a more matte look but if you want the rust to look shiny use a gloss sealer.   I've made a small spray booth out of an old cardboard box.  I removed just the top flap to allow me to see what I'm spraying.  This works great to keep the spray confined when I need to do this inside the workshop on a rainy day.  Just make sure to open a window for ventilation. This box is doing double duty; after rusting a bunch of roofing nails, I just stuck them in the top of the box to make them easy to spray seal.  This also works for screws and knobs.  Just a little workshop tip!


....and here's the finished product again.  The dramatic blue corner screen looks great in my new space.  There are two pair available.  They can be displayed separate or hinged together for a four panel screen....or they can be installed as originally intended as closet doors.

For Sale at  Consignage Home & Garden for $149.95 per pair.

Well, it's not raining, the sun is trying to break through and although it's cold outside I have HEAT in my workshop so I think it's finally time after the holiday hoopla for me to sneak away and see what projects await.