While I haven't posted in quite awhile, I can assure you I've been hard at work. Shortly after my last post, I was offered a space at
Consignage Home & Garden starting December 1. The call came on my way out of town for week and I wouldn't be arriving back home until just before Thanksgiving....no pressure there. Of course, I said yes and my wheels started turning. With my workshop now workable I decided to hit the ground running.

My new space had no real walls so I would need to get creative. Even when there are walls, I like to soften the corners or create a little interest on a flat wall. Folding screens are the perfect solution. They offer a pop of color, a little dimension, add height where needed, make a nice backdrop for vignettes, and when placed with the louvers up they are a great place to hang things.
I had two pair of unfinished closet doors found at Habitat For Humanity but you can also recycle old painted doors; just sand a little and clean them up for the first coat of paint. Since I've been going through a neutral finish phase on my refinishing projects, I decided to do something a little more bold on the doors to give me a darker backdrop to the lighter furniture. I didn't really have a color in mind when I started, but thought it was time to change it up and do something different than I've ever done before. Inspired by a French tablecloth, I decided on a mustard yellow under coat with a rich blue on top.
I usually use Antique Crackle from
The Old Fashioned Milk Paint Company, but have heard that white glue works too. I decided this would be the perfect project to do a comparison of the two.
I started with a first coat of Mustard Yellow from
The Old Fashioned Milk Paint Company. I use an old plastic bowl and wire whisk to mix the powdered paint and add Milk Paint Extra Bond.

You don't have to worry about complete coverage on the first coat since there will be a couple of other treatments to follow. The goal is to have just a little mustard yellow showing through the blue and you may want to have some of the natural wood showing through as well. (Note: The color in this photo has been enhanced and because of lighting is not a true representation.)
Once all four panels were painted, I applied white glue to one side of the doors in spots where I would want a little crackling. Although the glue goes on white, it dries clear and made it pretty hard to see where the glue was when I went to paint the second color. It's also thinner than the Antique Crackle and wanted to slip and drip while it was drying. It would have been better to let it dry on a horizontal surface.
On the reverse side of the doors, I used my usual Antique Crackle from
The Old Fashioned Milk Paint Company. I still prefer this product by far. It is thicker than the white glue and even though it is clear, it dries with a shine that makes it really easy to see when adding the second coat of paint.


The second coat of paint is also from
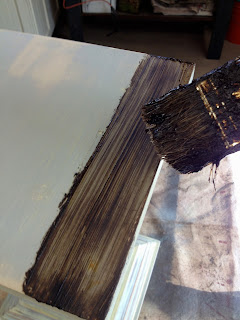
The Old Fashioned Milk Paint Company and is called Soldier Blue. Again, I didn't worry about complete coverage because I plan to sand the whole thing again anyway. I'll admit I got a little too messy applying the second coat of paint but this was an opportunity to show how you can't really mess up when creating distressed finishes.
When applying paint over crackle medium, the key is to brush the paint on in one stroke. If you go back over the crackle a second time you will actually smear and remove the crackle effect. What happens then is that in trying to get enough paint on your brush to get coverage in one stroke there are heavy paint areas and light paint areas. Also, because the crackle medium is shiny, the paint over the crackle has a different sheen than the paint over paint. In the end, I didn't see much crackling at all on the side with the white glue. The crackle was much better with the Antique Crackle medium.
The final sanding will even all that out. Just sand to blend the two finishes into each other and sand off any globs and drips. Sanding will also give the project a more "distressed" look than just a messy paint job.
Now, you can choose to seal the project in a couple of different ways. A clear sealer of any type will keep the color as you see it. I wanted to tone down the brightness and give the project even more depth so I chose to use Fiddes Supreme Wax in Rugger Brown. I've detailed this process in the post
How To Build A Bed From A Bench With A Barn Red Finish.
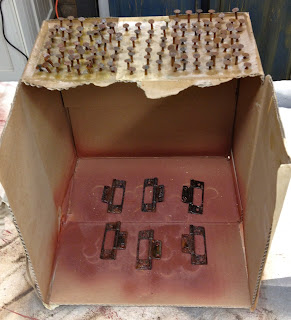
The last step was to age the hinges. I didn't want shiny new hinges on my distressed "aged" screen so while I was busy painting, the hinges and screws were soaking in a rust activator. After rusting things, I always use a clear spray sealer to give them a finished look. A satin sealer will give a more matte look but if you want the rust to look shiny use a gloss sealer. I've made a small spray booth out of an old cardboard box. I removed just the top flap to allow me to see what I'm spraying. This works great to keep the spray confined when I need to do this inside the workshop on a rainy day. Just make sure to open a window for ventilation. This box is doing double duty; after rusting a bunch of roofing nails, I just stuck them in the top of the box to make them easy to spray seal. This also works for screws and knobs. Just a little workshop tip!

....and here's the finished product again. The dramatic blue corner screen looks great in my new space. There are two pair available. They can be displayed separate or hinged together for a four panel screen....or they can be installed as originally intended as closet doors.
For Sale at
Consignage Home & Garden for $149.95 per pair.
Well, it's not raining, the sun is trying to break through and although it's cold outside I have HEAT in my workshop so I think it's finally time after the holiday hoopla for me to sneak away and see what projects await.


